Lamina GitHub

Turn a 3D model into flat parts you can cut.

Lamina slices, unfolds and nests a model into parts for paper, cardboard, plywood, acrylic or sheet metal — then checks that the result actually holds together, and hands you the cut files for a laser, a CNC router, a plasma table or a vinyl cutter.

A free replacement for Autodesk's discontinued Slicer for Fusion 360 — every construction technique of the original, plus sheet-metal ribs, connecting strips and per-slice edits it never had. Runs on your own machine; your models never leave it.

A quick word about the word “slicer”, because it trips almost everyone up: this is not the 3D-printing kind. Lamina works out the flat pieces — layers, stacked slices, egg-crate slots, ribs, a whole surface unfolded flat — that you cut from a sheet and put back together into the shape.

Try it in your browser Run it locally Source on GitHub ♥ Support on Ko-fi

Free software under the AGPL-3.0 · early alpha, and bug reports are very welcome

The browser version is the whole program running on your own machine's CPU: a bundled model slices in seconds, a detailed scan in under half a minute, with a progress bar while it works. The local and Docker versions are the same code and a little faster still.

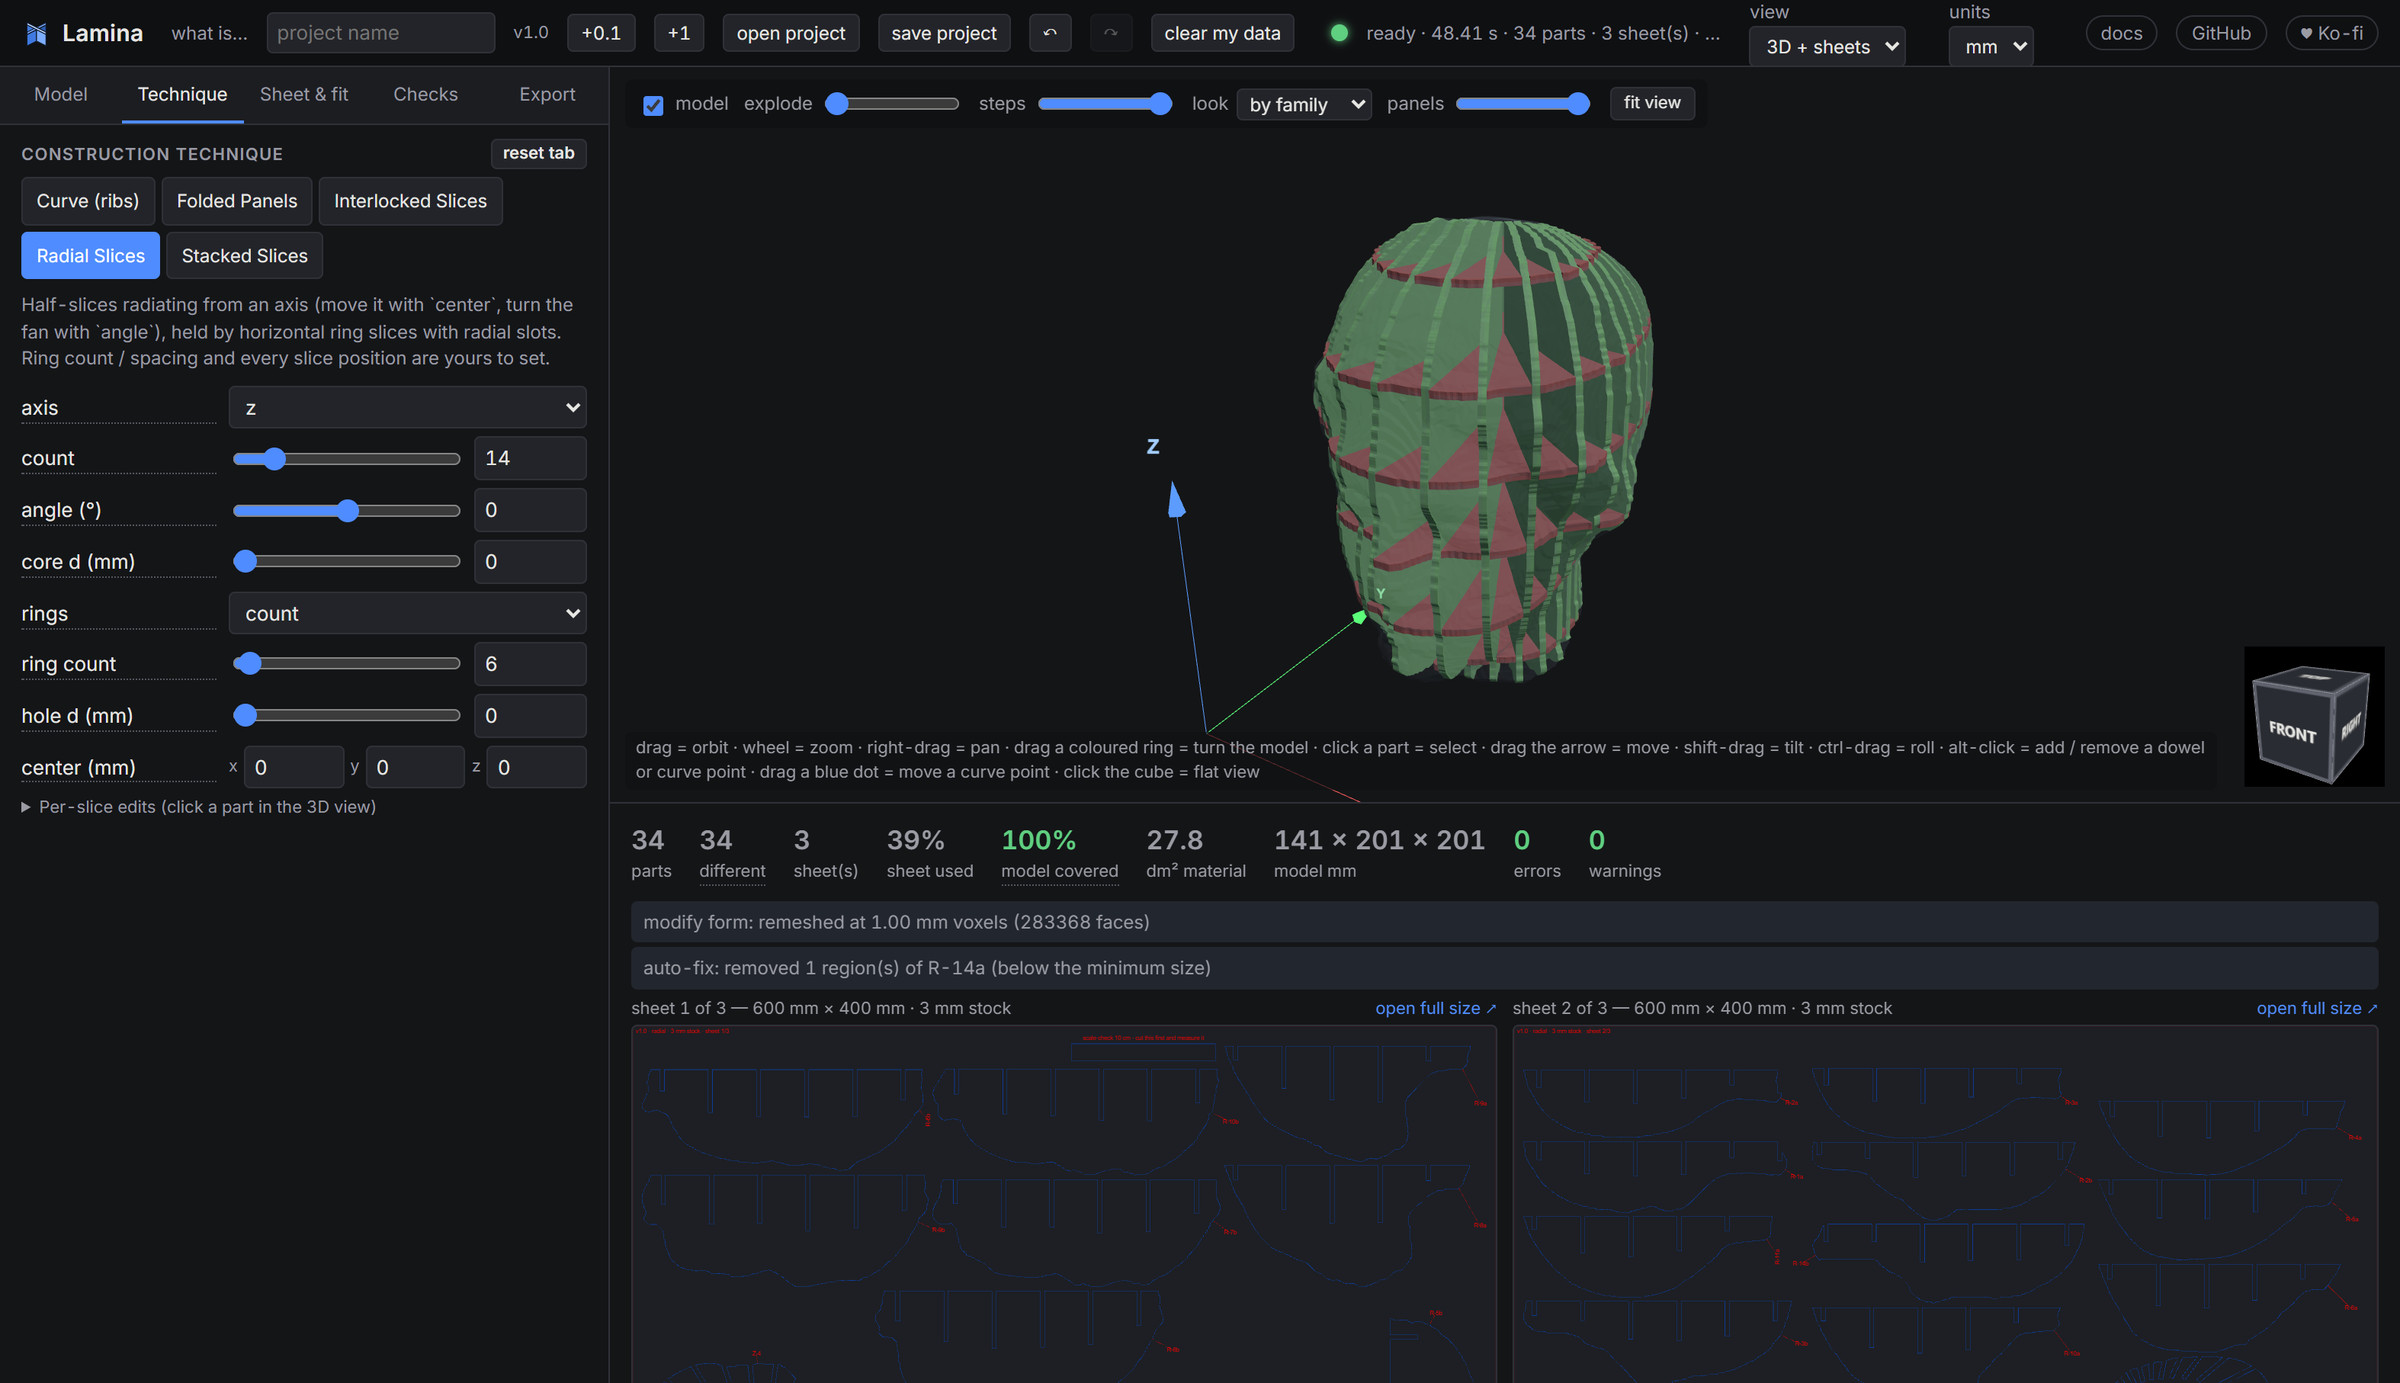
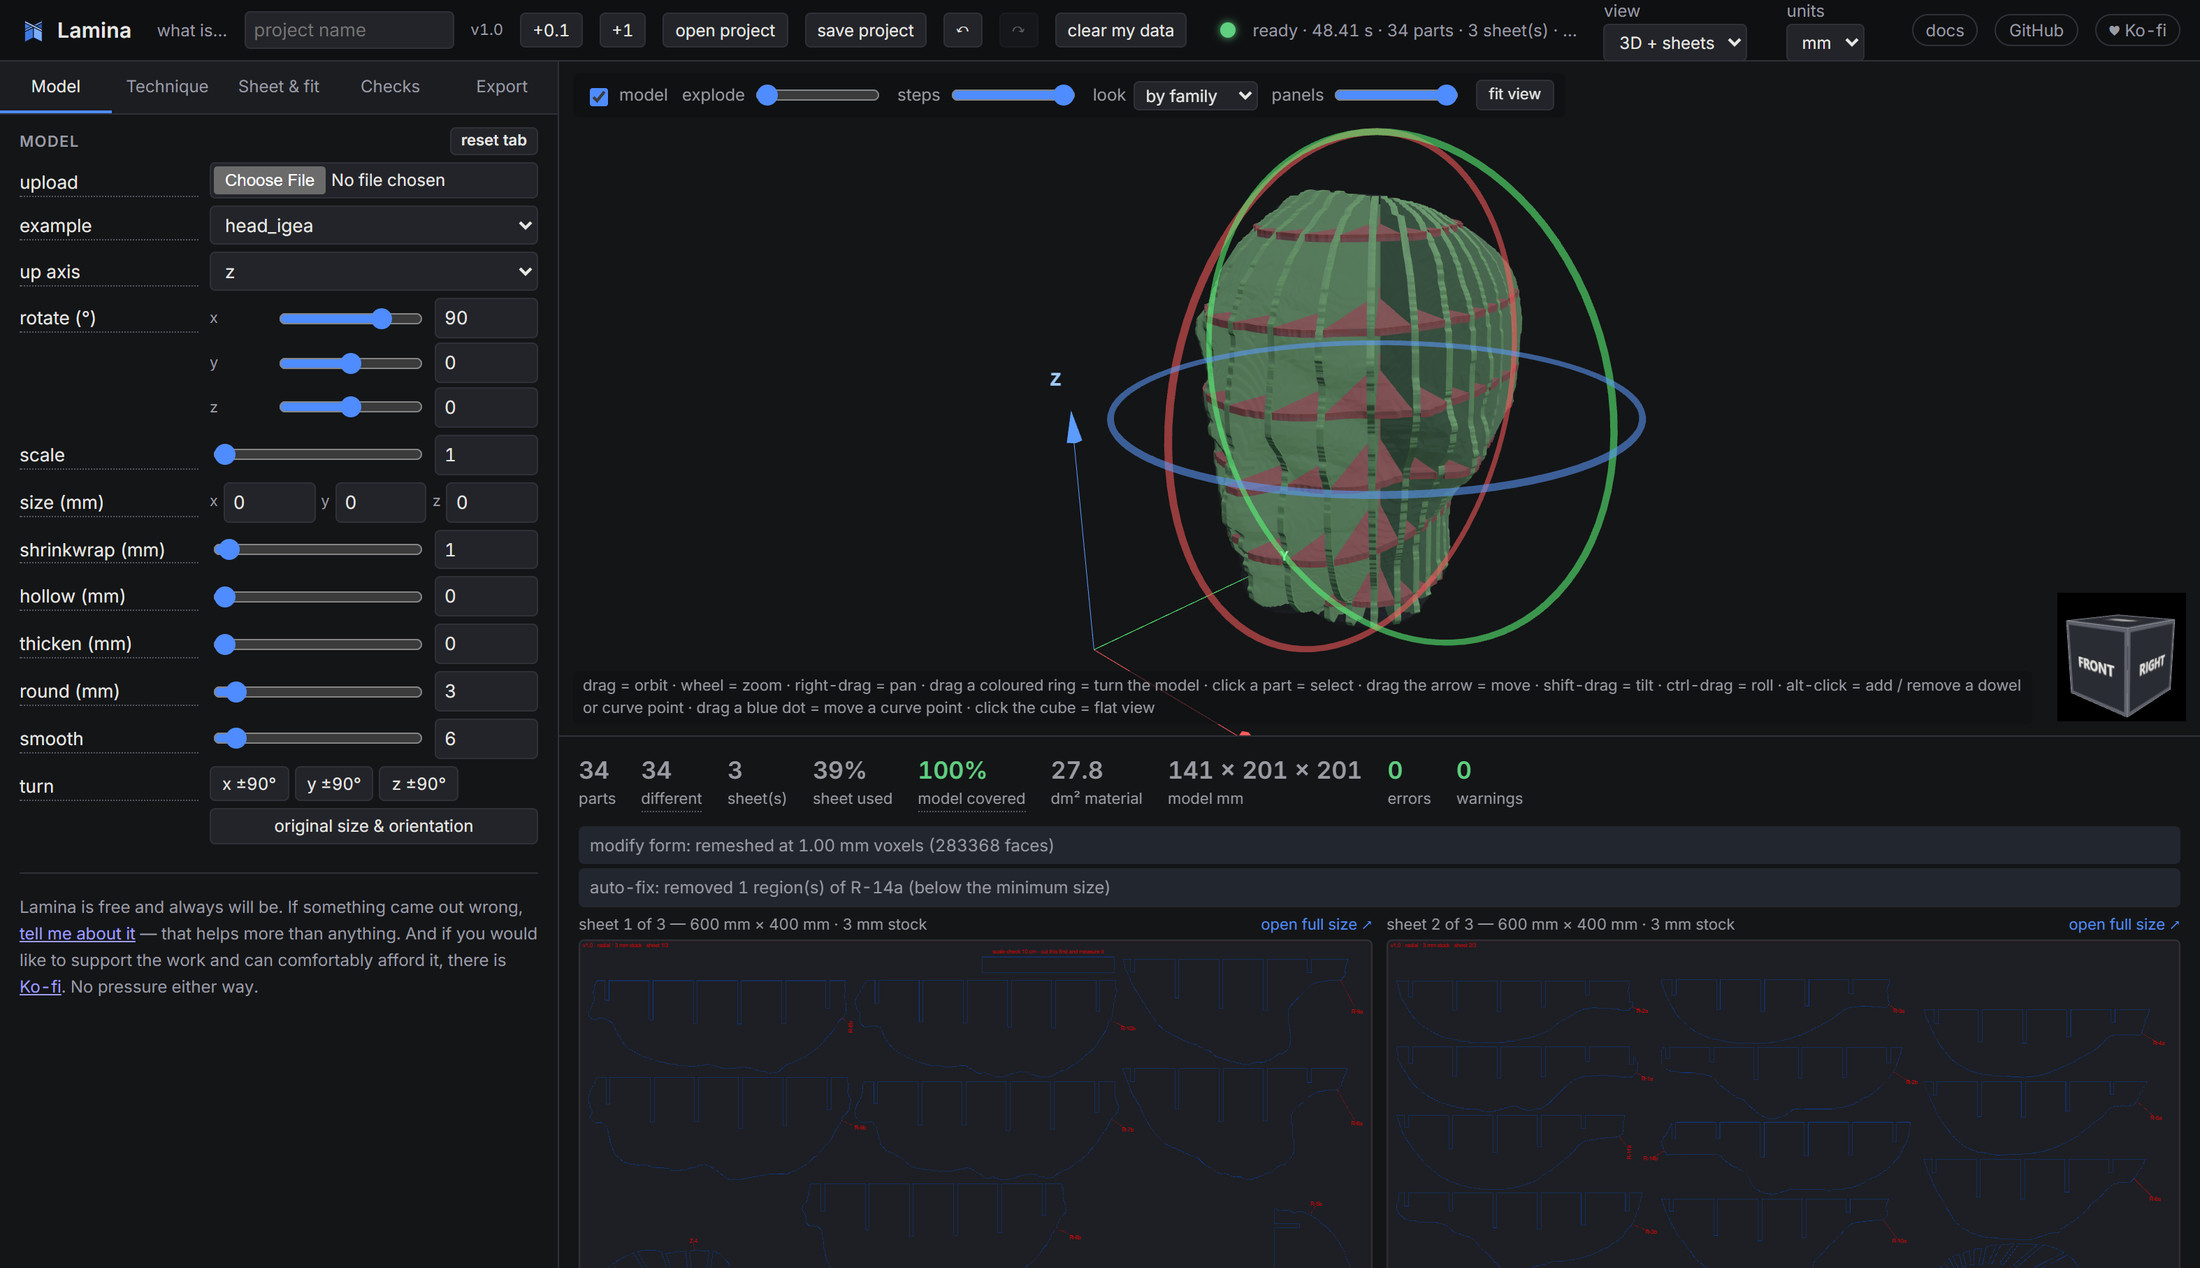
The Lamina interface: parameters on the left, a 3D preview of a radially sliced head in the middle, cut sheets below.
The 3D preview and the cut sheets are always the same plan.
5construction techniques
13folded-panel joints
6cut and 3D formats
0.2–9 mmpaper to plywood

Four steps, one screen

Load a model, choose how to build it, fix what will not work, export the sheets. There is no render step: change a number and the 3D preview and the cut sheets rebuild together — instantly on a slice job, a few seconds on a detailed folded one.

Orbit, zoom and pan the assembled result. The original model stays as a ghost behind the parts.
  • Load — STL, OBJ, 3MF, PLY, OFF or GLB; STEP and BREP with the optional CAD extra.
  • Prepare — turn it upright, scale it or give a target size, round off details too small to cut, smooth noise, hollow it out or thicken thin walls.
  • Build — pick a technique and its parameters; move, tilt or delete individual slices by hand.
  • Check and export — physical checks with one-click fixes, then cut files, a solid, or a scaled 3D-printable prototype.
The model tab with rotation rings around the model
Drag a coloured ring to turn the model, or use quarter-turn buttons. Round, smooth, hollow or thicken it first — the same voxel pass that repairs meshes that are not watertight.

Five ways to build a model

Each technique on a shape that suits it. Switching technique keeps your material and sheet settings, and remembers the parameters you had for each one.

Stacked slices

Parallel sections along one axis, touching or with an empty space between them — the topographic look. Hold them with dowel rods (round, square, hexagonal, cross or slot holes), flat pegs cut from the same sheet, or tabbed spacers that keep the gap. Connection points can repeat through the whole stack, be random per pair of slices, or follow 3D lines you draw; alt-click a slice to place one by hand. The outline can also follow the surface across the slice's thickness, which is what Autodesk's Slicer called 3D Slices — cut it, then sand down to the shape.

In the clip: a 300 mm horse in 3 mm cardboard, 28 layers with a 6 mm gap on 3 mm square dowels at random points; then the gap set to none, 12 mm and back to 6 mm. Every dowel keeps a 2 mm wall to the outline, so the legs hold.

Parameters: axis · spacing or count · gap · outline mid / outer / inner · connector type, size and hole shape · placement · points per island · per-slice offset, tilt, roll and thickness.
Interlocked slices

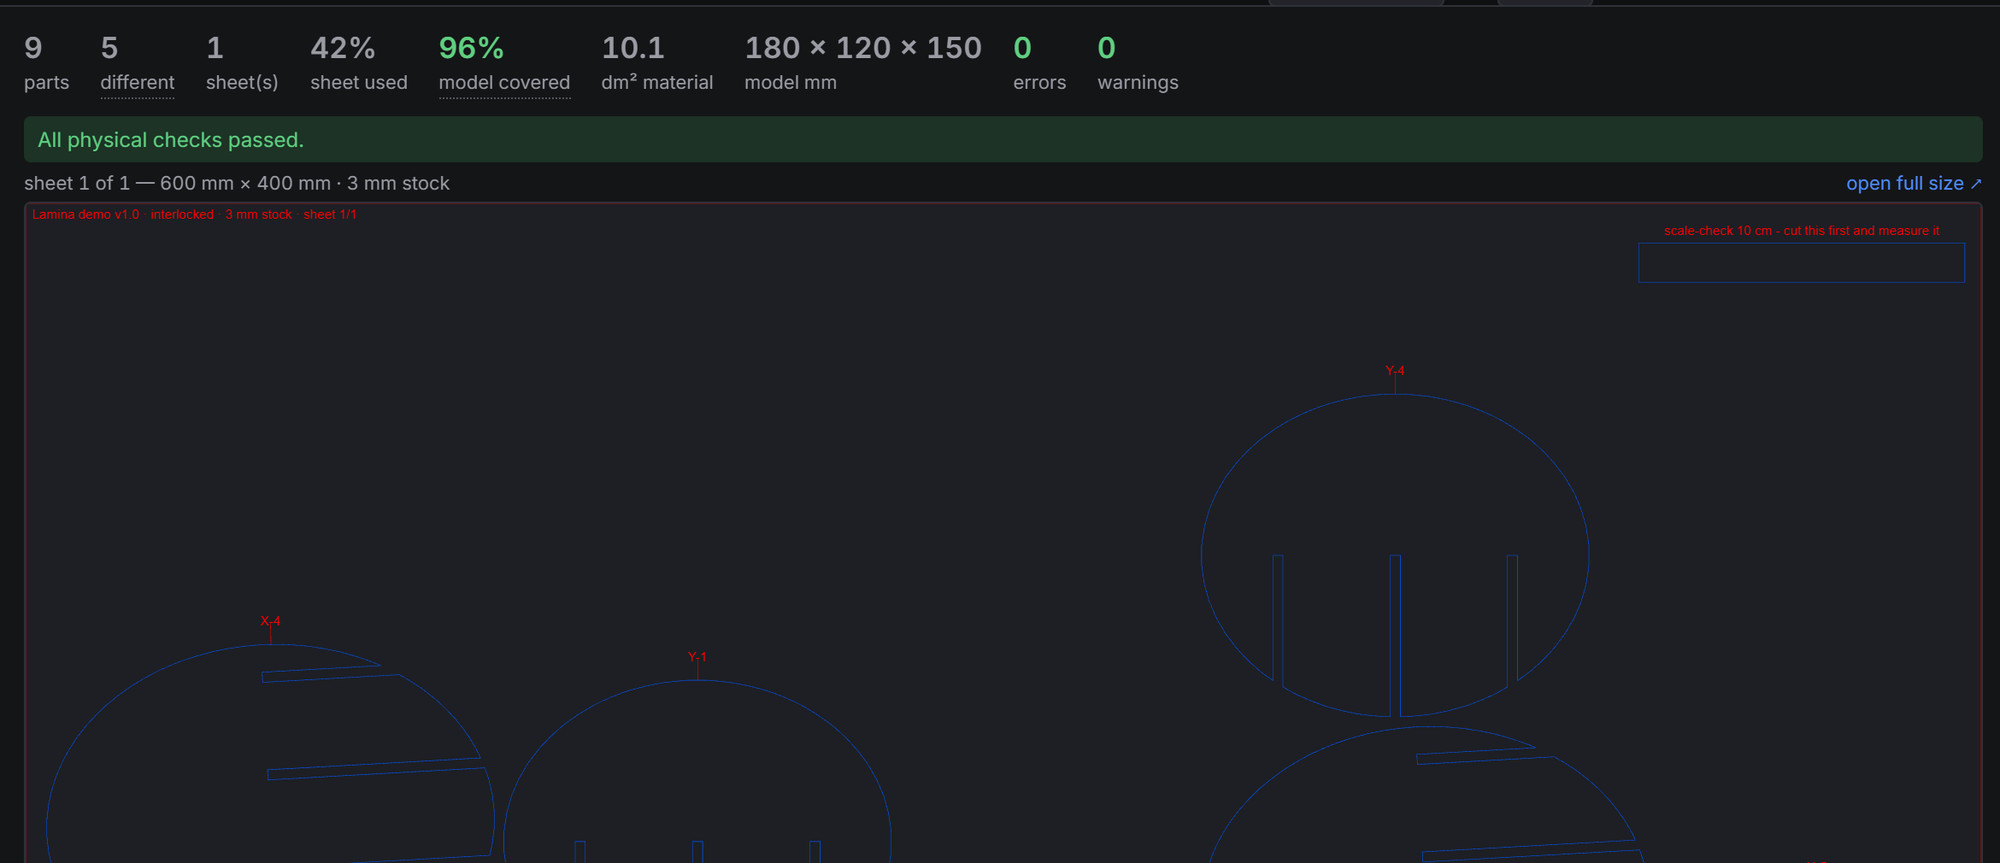
Two perpendicular families of slices that slot together egg-crate style, one family inserted from above, the other from below. The slot depth is computed per crossing by casting the intersection line against the mesh, so hollow and asymmetric shapes notch correctly where the earlier tools left them loose. Notch ratio, mouth flare and dog-bone relief for routers are all there, and the checks add a crossing slice wherever a region would float.

In the clip: the torus in 3 mm cardboard, 9 by 7 slices; then 6 by 5, 12 by 9 and back to 9 by 7. The denser it gets, the more of the surface the edges describe — and the more slots to cut. A torus because every vertical line meets its tube once: the head's ears sit above its skull on the same lines, and the insertion check rightly refuses that.

Parameters: assembly axis · count or spacing per family · grid rotation · extra slices at chosen positions · notch ratio, flare and relief · slot offset for a press or a loose fit.

Radial slices

Half-slices fanning out from an axis you can move and turn, locked by horizontal ring slices with radial slots. Made for shapes with a centre line — vases, heads, figures, lamps. Lamina works out the smallest core the slices can share around the axis and refuses a smaller one instead of letting them collide there.

In the clip: the snowman, 10 half-slices and 6 rings in 3 mm cardboard; then 6, 14 and 10 slices, and 3, 9 and 6 rings. More rings lock it stiffer, more slices smooth the silhouette.

Parameters: axis and centre · slice count · fan angle · core diameter · ring count or spacing · centre hole for a rod.

Curve — ribs

Ribs perpendicular to a curve you draw through the model, so they follow a bend instead of staying parallel: the vertebrae of an animal, the frames of a hull, the arch of a bridge. Spine slices in the curve's plane lock the ribs together. The turn between neighbouring ribs is limited so they never meet inside the model; the note tells you when a gentler curve or fewer ribs would keep them square to it.

In the clip: the horse with 20 ribs along a five-point curve that runs down the back and climbs the neck to the head, locked by one spine that runs between the legs (the orange line and blue dots are the curve — drag a dot to move it, alt-click the model to add one, alt-click a dot to remove it); then 8, 12 and 20 ribs, and the head control point pulled down and back up. Past twenty the ribs would cross inside the neck, and a second spine would cross a leg and the body on one line — the checks say so.

Parameters: curve plane · control points · rib count or spacing along the curve · spines.

Folded panels

The surface simplified to the facet size you choose, unfolded into flat panels with score lines, and joined at the seams with any of thirteen joints — glue tabs for paper and card, laces and rivets for leather and cloth, strips for cardboard, slotted angle ribs for sheet metal. Panels grow until they would overlap themselves or run off the sheet. Works on closed shapes and on open surfaces such as a mask or a clothing pattern; separate mode cuts every triangle alone for shapes with deep cavities.

In the clip: the cow at a 15 mm facet in 1 mm card, 19 panels with tabs; then laced, then ribs, then tabs again, and a coarser 25 mm facet against the 15 mm one.

Parameters: facet size · growth strategy and faces per panel · joint · hole, inset, spacing and tab sizes · rib width and material · perforated folds · seam numbers on both panels.

Folded panels, thirteen ways to join them

Glue tabs for paper, laces and rivets for leather and cloth, connecting strips for cardboard, slotted angle ribs for sheet metal. Joint sizes adapt to the triangle they sit in, and a hole or slot never crosses a fold line.

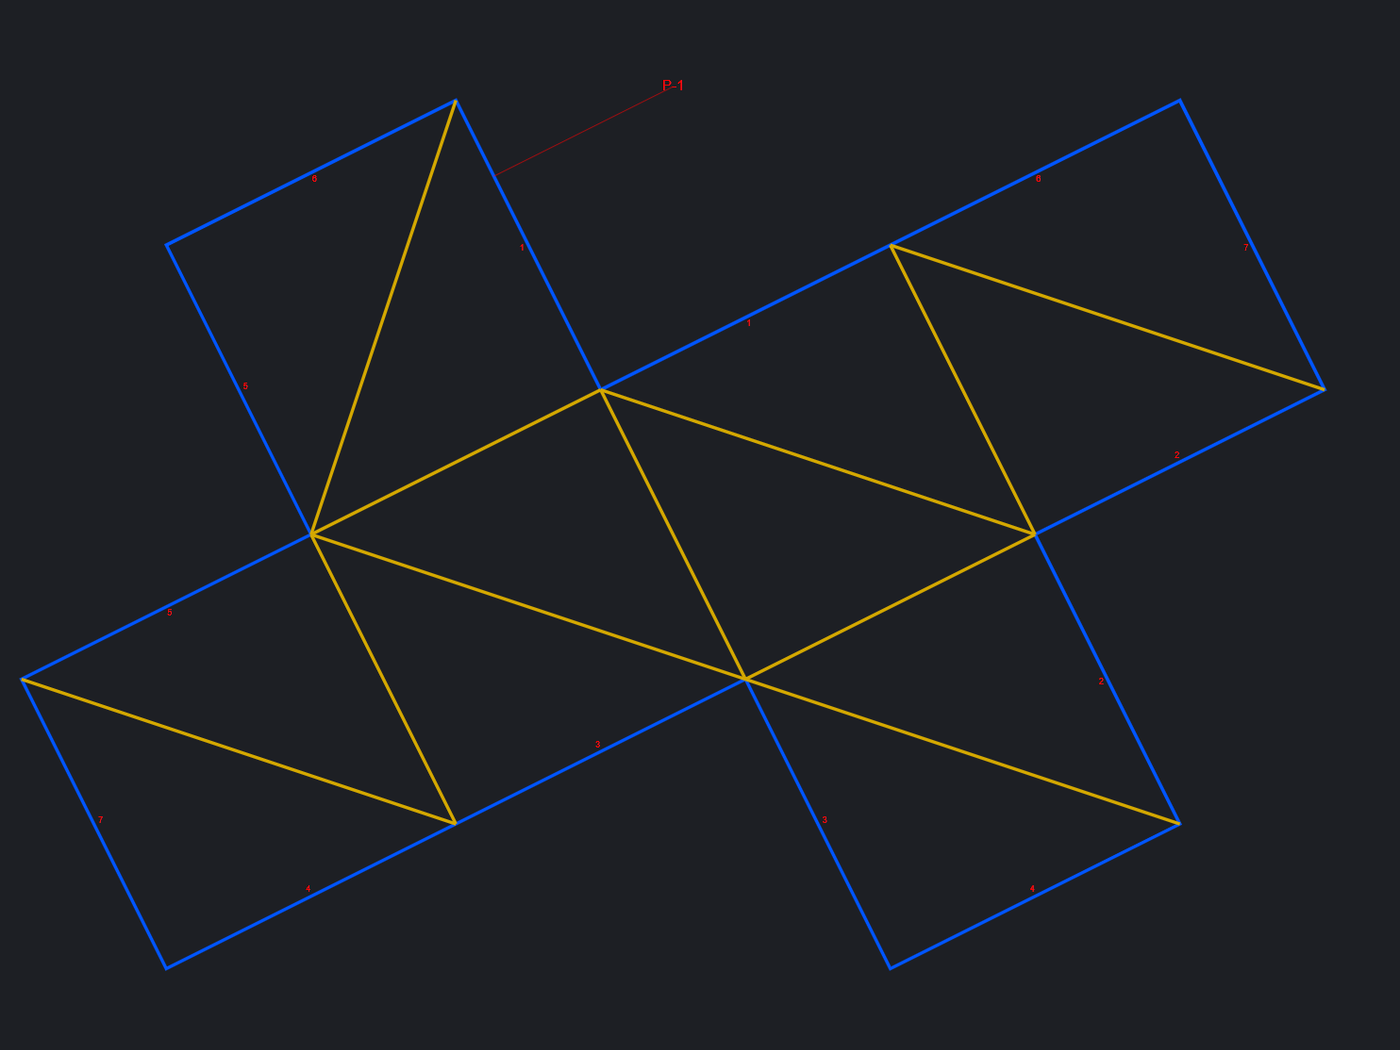
The cut sheet of a cube net with the seam joint on every seam
seam — plain edge, glue or sew it. Every picture is the same 90 mm cube net; pick a joint above.
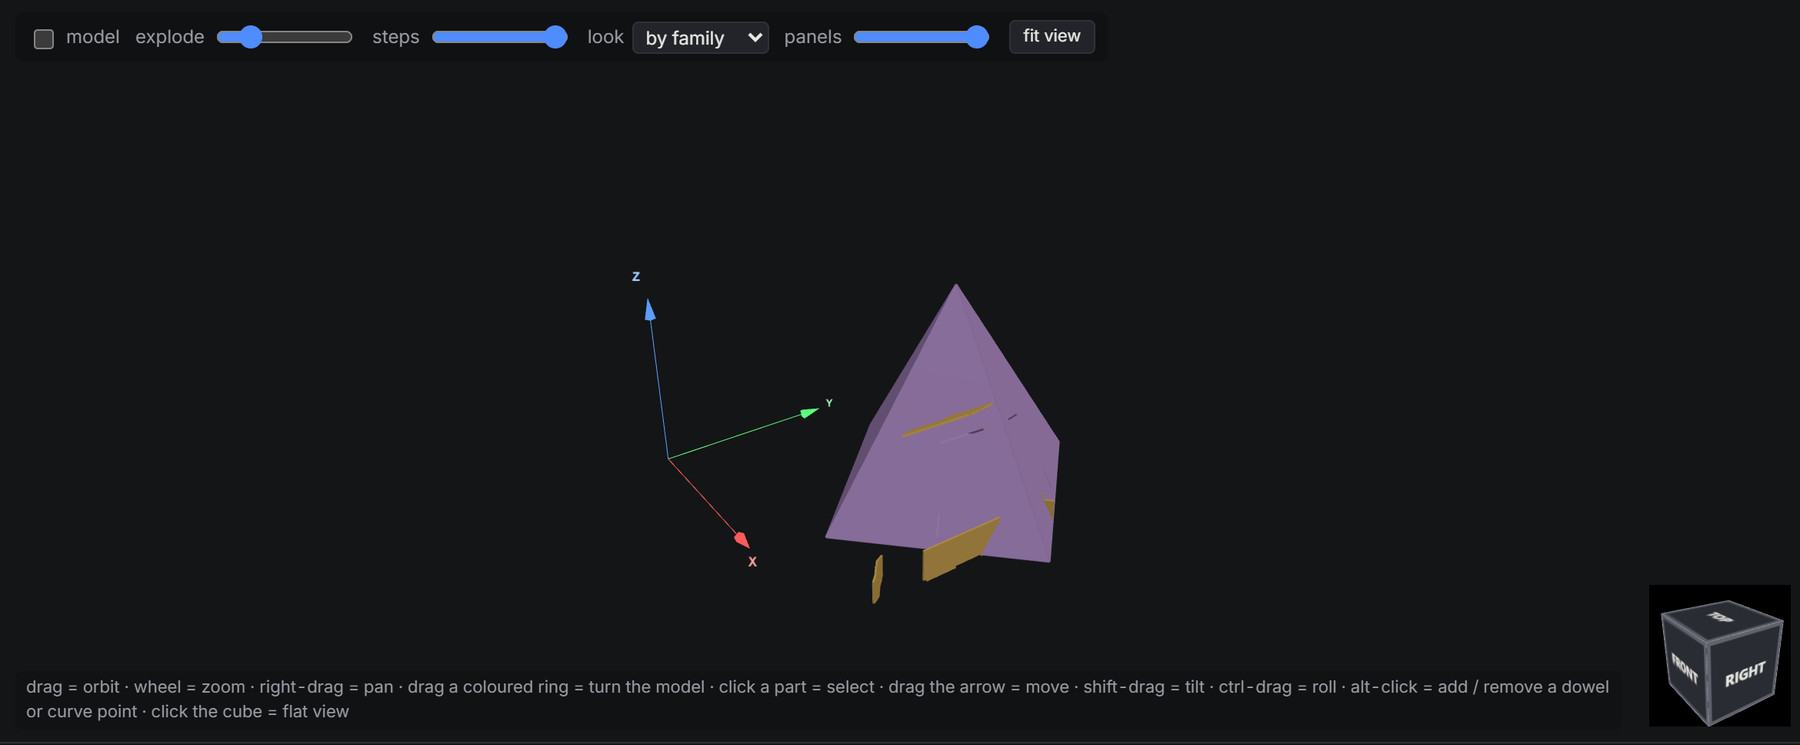
A pyramid's folded panels pulled apart with the explode slider, the angle ribs floating at their seams
A pyramid pulled apart with the explode slider: the angle ribs sit at the seams, one per cut edge. Each rib is cut at the real fold angle and carries that angle as its label.
  • Every face on its own — separate mode cuts each triangle alone and laces it to its neighbours, which works on any shape, however many cavities and undercuts it has.
  • Panels that fit — panels grow until they would overlap themselves or run off the sheet, with three growth strategies and an automatic mode that tries all of them, up to 800 faces, and keeps the fewest, most compact panels.
  • Detail you choose — set the average triangle edge in millimetres, not an abstract count.
  • Numbered seams — the same number is engraved beside the joint on both panels, so mating edges are easy to find on the cut sheet.
  • Different material for the ribs — ribs can be thicker than the panels; the slots follow.

The unfolding follows the papercraft literature — minimum-angle spanning trees, strip-based approximation, overlap-driven cuts. The algorithm notes list what was taken from which paper.

Move a slice, watch everything follow

Click a part in the 3D view to select it. Drag the yellow arrow to slide it along its normal, shift-drag to tilt, ctrl-drag to roll, or use the sliders.

The selected part is highlighted on the cut sheet — and clicking a part on the sheet selects it in 3D. Clicking any warning does the same.
Step through the assembly part by part, then explode it — the same order you would build it in.
  • Alt-click a slice to place a dowel or peg exactly where you want it, or to add a control point to the curve — then drag the point where you want it; or to add a control point to a curve.
  • Per-slice edits — position, tilt, roll and thickness, so you can mix materials in one model.
  • Material look — cardboard, paper, plywood, steel or plastic, to judge the result before cutting.
  • Panel transparency to see the connectors inside a folded shell.

It tells you what will not work — and offers the fix

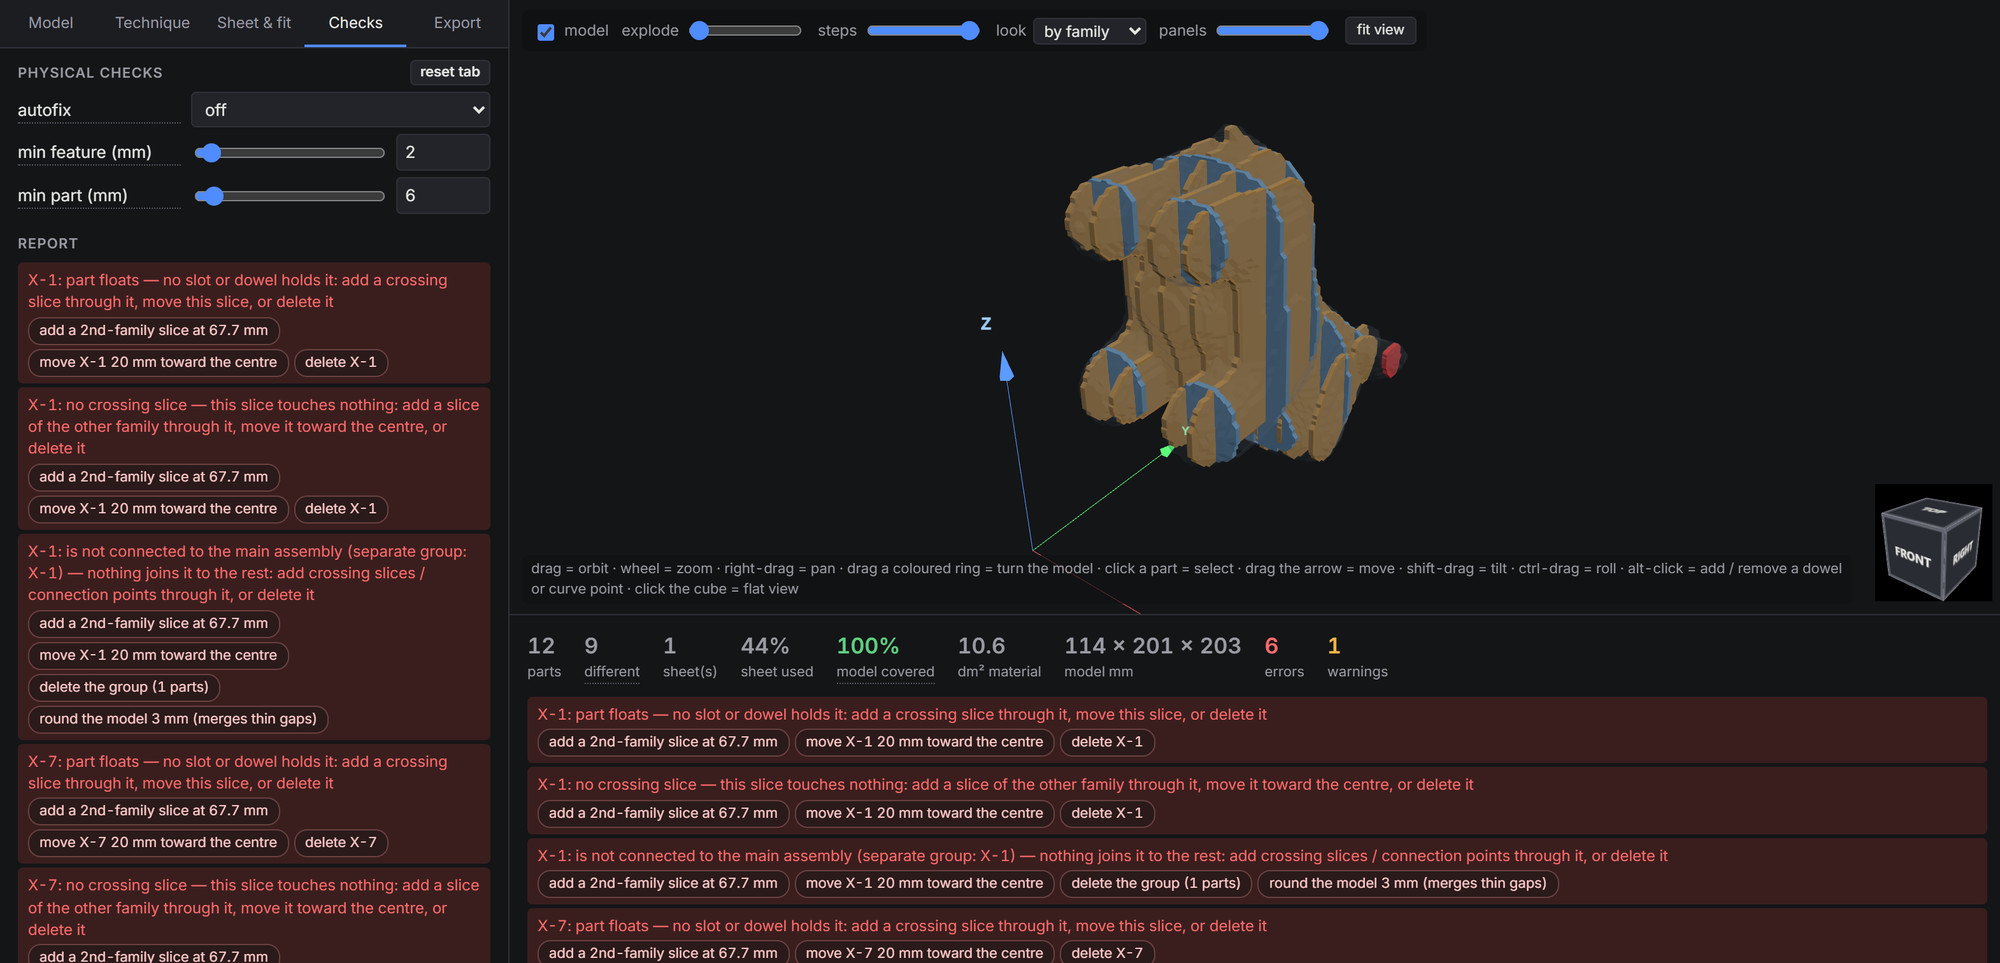
Lamina checks the plan as a physical object, not just as geometry. Every message says what is wrong and what to do about it, and most carry buttons that apply the change.

The checks tab listing errors with one-click fix buttons
Errors mean it will not work, warnings mean look at it. Auto-fix can add crossing slices where regions float, then remove what still cannot work, and it lists everything it did.

Held together

Each region must reach the main body through a slot, a connector or glued contact. A head joined to nothing is reported as a separate group.

Cuttable

Parts too small or too thin to handle, bridges that snap, slots that sever a part, holes too close to an outline, two cuts overlapping.

Buildable

Slices of one family that collide, radial slices meeting at the axis, slots opening away from the insertion direction, parts larger than the sheet.

A coverage figure tells you how much of the model the parts actually represent, so a leg or an ear that no slice reaches does not slip through unnoticed.

Nesting, labels and cut files

Two cut sheets with nested parts, labels beside each part
Parts are rotated and packed against each other's outlines, not their bounding boxes — above 150 parts a rectangle packer takes over to keep the preview live. Labels are engraved beside the part with a leader line wherever there is room; only a fully crowded sheet puts one on the part.
  • SVG and DXF with separate layers for outer cuts, inner cuts, score lines and labels, with or without the labels, in millimetres, centimetres or inches.
  • PDF as one page per sheet, and EPS per sheet.
  • One file per piece when your cutter wants them separately — identical pieces once, with the quantity in the name, and a cut list.
  • One thickness per sheet — change a part's thickness and it is cut from other stock, so it gets sheets of its own. Every sheet says the stock it needs, and the file names carry it as soon as a job mixes them.
  • STL of the assembled result, or of a single part.
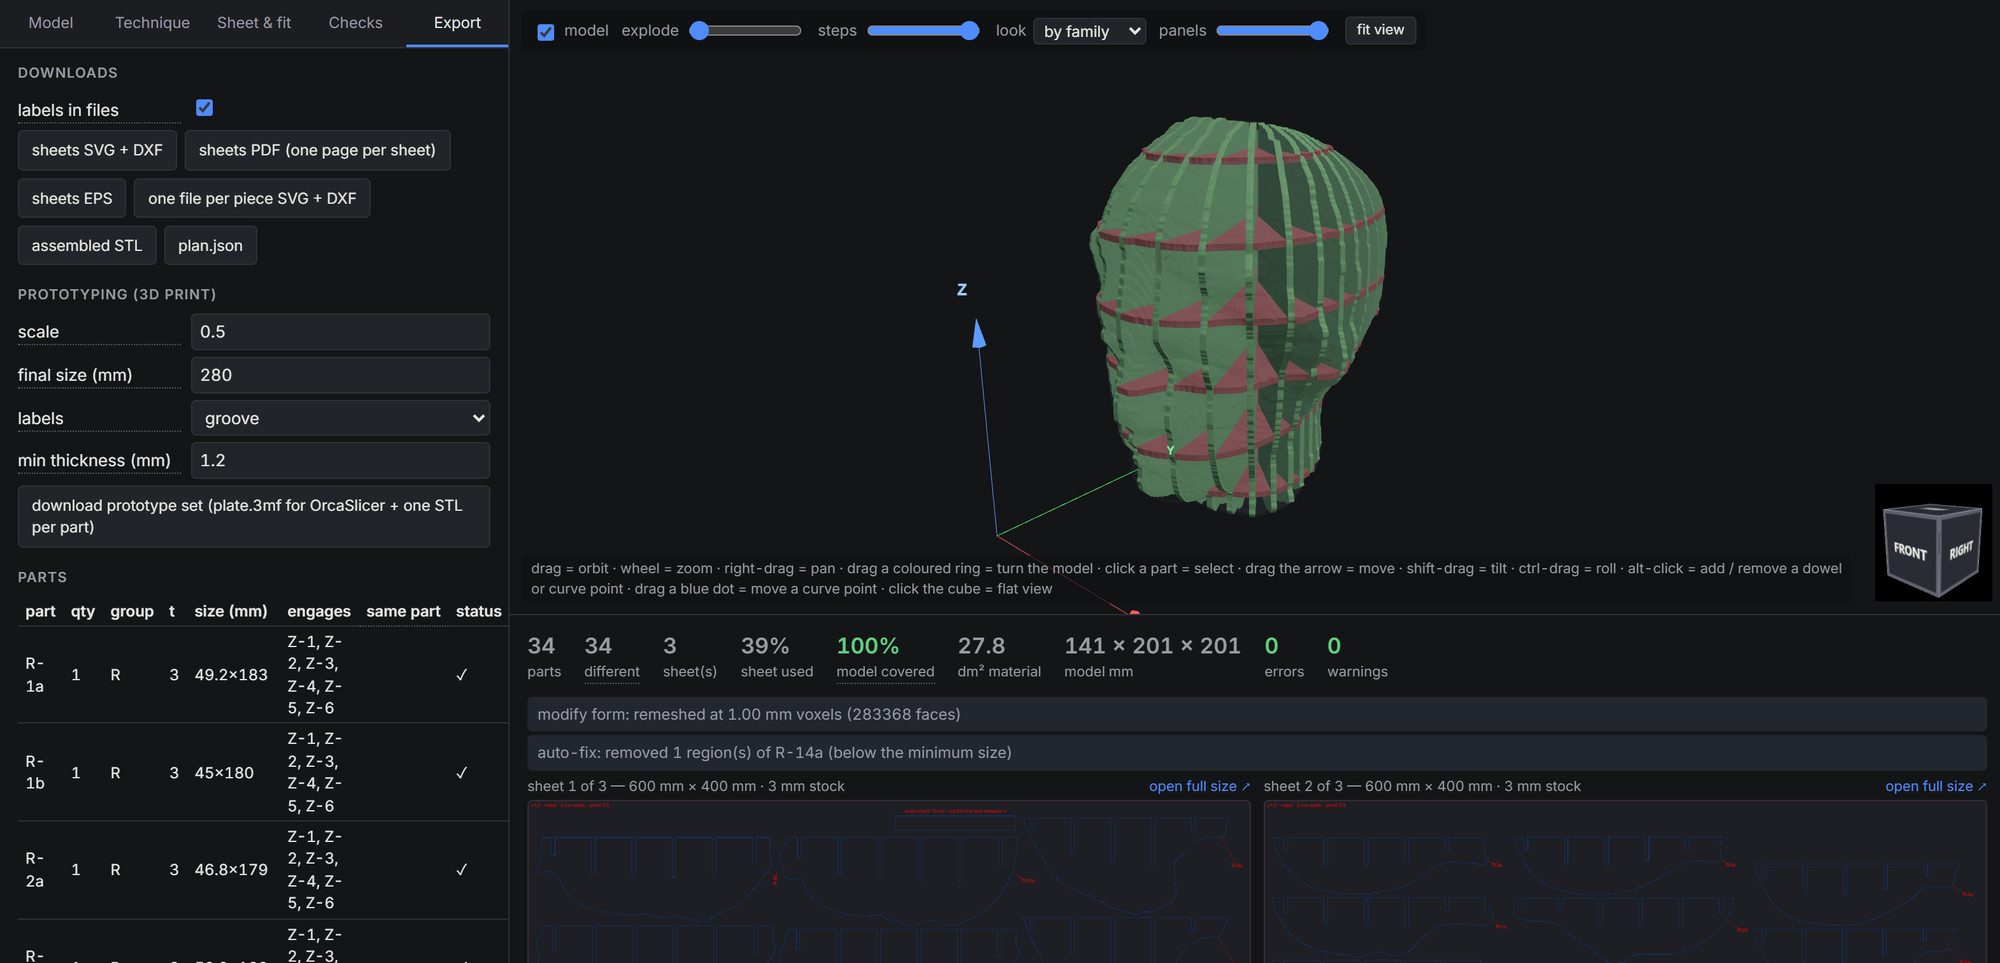
  • 3MF prototype — every part flat and scaled, thickness raised to something printable, its label engraved into the surface, as separate named objects your slicer can arrange.
  • Kerf and fit — kerf compensation when your machine does not do its own (off by default), a fit offset on every slot, dog-bone relief for routers, and a 10 cm or 4 in scale-check bar on every export.
The export tab with download links and prototyping options
The export tab, including the prototyping set for test-printing a design before cutting it.

Where it stands

Early days. Lamina is very new — an alpha, free under the AGPL-3.0 and written in the open by one person. Every construction technique of the original Slicer is in and the physical checks go further than it did, but expect things that do not work the way you expect yet. Please go and find them, and tell me what broke — every report makes the next person's cut come out better, and nothing is too small to mention. The template asks for the saved project file, which carries the model and every setting. While it is this young, read the checks and test-cut before committing expensive material.

Not there yet

Seams are chosen automatically — you cannot click an edge to add or remove one. Insertion is simulated as a straight slide along each crossing line — a part that would have to turn or flex on its way in is not caught.

Where it gets rough

Nesting is greedy: parts go to the corners other parts leave, so concave shapes that would need to slide into each other pack looser than a no-fit-polygon nester would manage. A detailed folded model takes a few seconds per change.

What you need

Python 3.11 or newer, uv, and a browser with WebGL — or just Docker. Several people can share one server, each browser tab with its own session, but Lamina has no login of its own: put it behind your proxy's authentication before it faces the internet.

The parity notes compare Lamina option by option with the original Slicer and say what is still missing. Issues and pull requests are welcome — a new construction technique is one file in core/modes/, about 70 lines; checks, nesting and export are shared.

Run it

Python and uv; everything else is installed for you. It runs locally — your models never leave your machine.

# add --extra cad to uv sync for STEP and BREP import
git clone https://github.com/marcelfarres/lamina.git
cd lamina
uv sync
uv run uvicorn web.app:app --reload --port 8000
# then open http://localhost:8000

Or run it as a server and skip the source entirely — the image carries everything, each browser tab gets its own session, and an idle one is cleaned up after a day:

docker run -d -p 8000:8000 -v lamina-jobs:/app/working-files ghcr.io/marcelfarres/lamina:latest

docker-compose.yml is the same thing as a stack for Portainer, Dockge or Komodo.

The Model tab opens on a bundled example, and the examples folder holds 21 in all — geometric shapes, a scanned head and animals. The same pipeline runs headless, so it can be scripted or put in a build:

uv run python -m core.plan examples/egg.stl --mode interlocked --set nx=5 ny=4 --out out/egg
uv run python -m core.export out/egg.json --out out/egg_cut --fmt svg dxf pdf --labels
uv run python -m core.solid out/egg.json --proto out/egg_proto --scale 0.4 --labels groove
uv run python -m core.plan examples/egg.stl --list-params

Support, if you would like to

Lamina is free and always will be: AGPL-3.0, no account, no upsell, no paid tier waiting quietly in the wings. None of that depends on anyone giving me anything.

If you like this or any of my other projects and you want to support the work, a donation is very welcome — only if you can comfortably afford it, and with no pressure at all.

♥ Support on Ko-fi Send a bug report

There are other ways to help that are worth just as much: tell someone who cuts sheet material that this exists, show me what you made with it, or open an issue when something goes wrong. Honestly, a good bug report is worth more to me than a coffee.